Streamlining Next.js Deployment on AWS with CI/CD
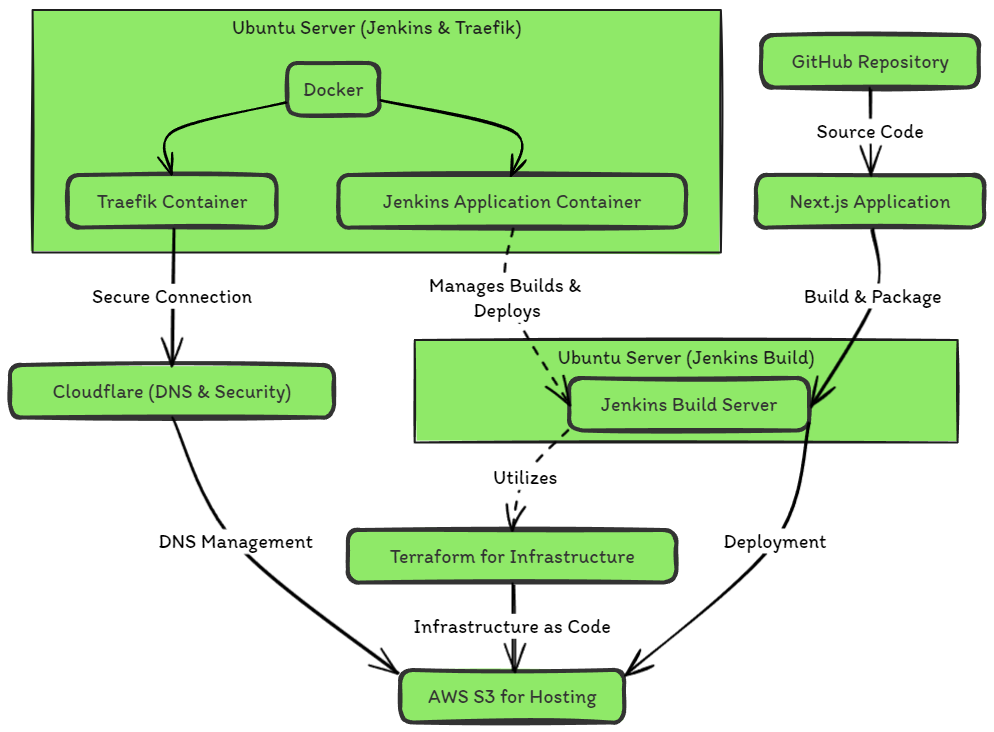
Leveraging the capabilities of Traefik, Docker, Jenkins, and Cloudflare enables the development of a robust deployment pipeline that streamlines the continuous integration and delivery process. This approach simplifies the process of building and deploying Next.js web applications to AWS S3 on a secure domain.
Prerequisites
-
An AWS account | Sign up or log in here
-
A Cloudflare account and a configured domain | Sign up or manage your domains here
-
A GitHub account | Sign up or log in here
-
Minimum of 2 Ubuntu servers
Architecture Overview
Initial Setup
System Preparation
Making sure the server is up to date allows us to install Docker and Docker Compose which forms the groundwork for the project.
In this step, we're configuring Traefik as a reverse proxy for containerized applications. This setup enables our Docker container apps to be web-facing without requiring multiple ports to be opened.
Setting Up Traefik

Traefik directs incoming HTTP requests to designated Docker containers according to predefined rules and configurations. This setup enables us to assign our services to a domain for easy access via the URL.
- Create a Directory for Traefik Configuration:
- Create the Docker Compose File:
The compose file configures a Traefik container to route traffic to the appropriate containers, listening on ports 80 and 443, while leveraging Let's Encrypt to secure connections.
In the configuration, environment variables ensure that sensitive information is not exposed in plain text. These variables can be manually set in a .env file, while using a hashed password for the HTTP_BASIC_PWD, providing an additional layer of security.
- Create Environment Variables:
Generating a hashed password is the method which will be used to set the password which will be used to access the Traefik dashboard
The command produces an output e.g $1$sGygDZAq$5nIo1NStr9vKxCvnNsa1o/ which will be used for the password value
- Create Environment Variables .env:
The required variables set up Traefik with the chosen entries - HTTP_BASIC_USER and HTTP_BASIC_PWD are the values that will be used to log in to the Traefik dashboard on the specified domain name, which is "traefik.yourdomain.com".
- Add Subdomain Entry
In the docker-compose configuration, the domain configured to access the Traefik dashboard is traefik.{DOMAINNAME} Adding the following DNS rule to Cloudflare is required for the domain to resolve correctly.
- Create the Docker Network and Launch Traefik:
For all of the Docker containers to communicate and work within Traefik they will all be on the same Docker network which will be created, In this instance it is named web
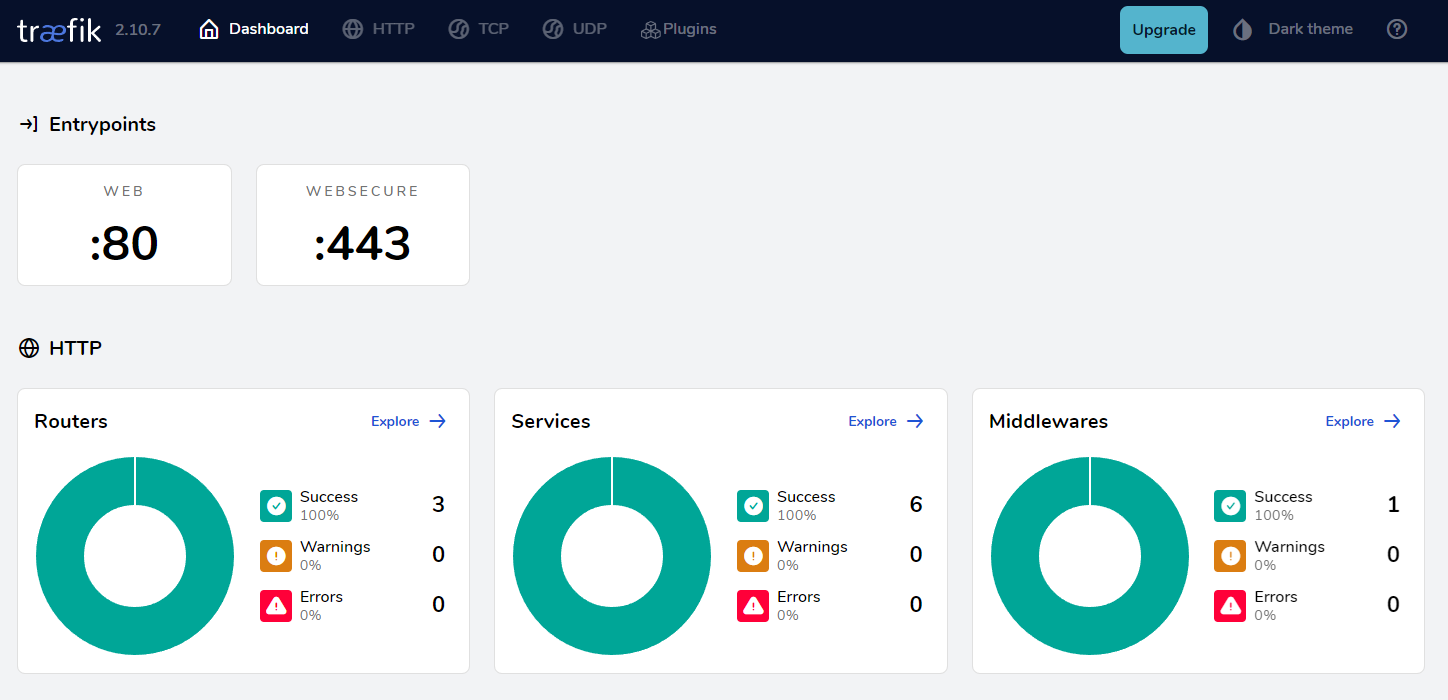
The Traefik container is now running and accessible with the assigned domain name traefik.mydomain.com and populating the username and password fields with the assigned credentials
Setting Up Jenkins
Jenkins can now be set up, which will serve as a CI/CD automation server. Jenkins enables us to automate the building, testing, and deployment of Next.js projects. Integrating Jenkins with Traefik offers easy access to Jenkins services through a single entry point.
- Create a Directory for Jenkins Configuration:
- Create the Docker Compose File:
This compose file sets up a Jenkins container with Traefik acting as a reverse proxy. Traefik is configured to route traffic to Jenkins, ensuring secure connections via HTTPS. Once the DNS record has been added, Jenkins is accessible via the specified domain (jenkins.YOURDOMAIN.com). Additionally, Traefik handles SSL/TLS certificates using Let's Encrypt (certresolver=myresolver).
- Add Subdomain Entry
In the docker-compose configuration, the domain configured to access the Traefik dashboard is jenkins.YOURDOMAIN.com
Adding the following DNS rule to Cloudflare is required for the domain to resolve correctly.
- Launch Jenkins:
The Jenkins container is now running and accessible with the assigned domain name jenkins.YOURDOMAIN.com
- Unlock Jenkins:
Unlocking Jenkins requires an administrator password
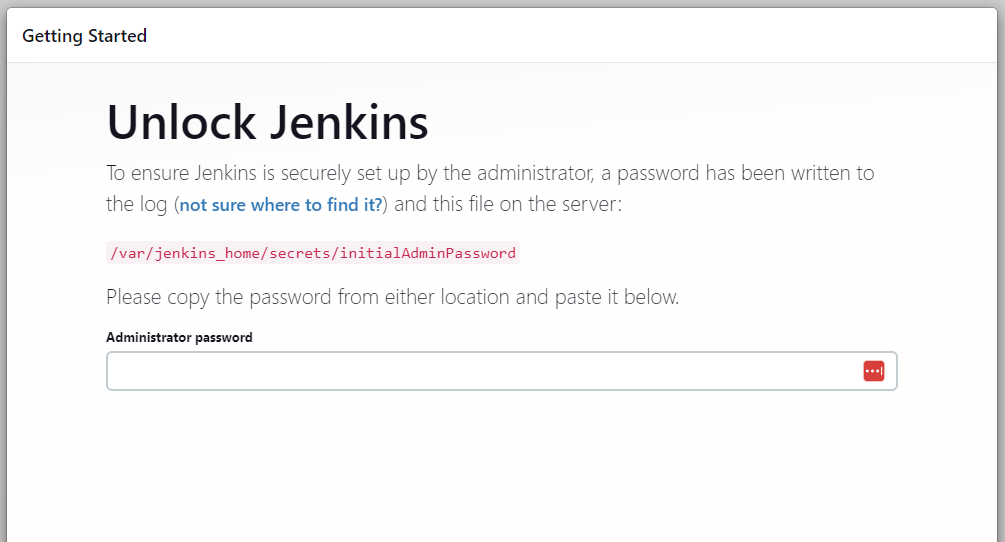
This can be found within the following path /var/jenkins_home/secrets/initialAdminPassword
Alternatively, checking docker-compose logs also includes the password:
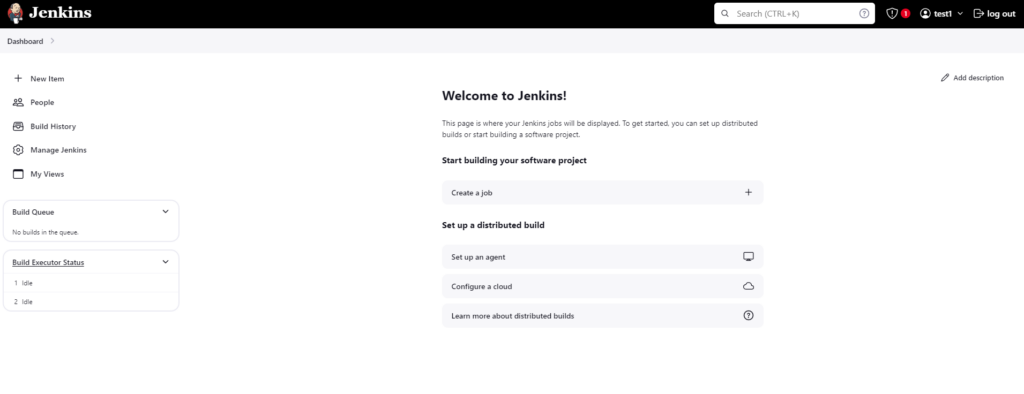
The Jenkins setup can be completed by following the initial setup wizard
-
Selecting Install suggested plugins
-
Creating an Admin user
-
Inputting the Jenkins URL with the assigned domain name
Setting Up Jenkins Node
In this step, we're setting up a Jenkins node to serve as a dedicated worker. This offloads resource-heavy tasks from the master server and optimizes overall efficiency in our CI/CD workflow.
-
Setup Server SSH Keys Setting up SSH keys for the Jenkins node is essential for the Jenkins master node to communicate with the secondary client and run successful pipeline builds.
-
Assign the server with a public key
-
Securely store the corresponding private key to be used later
-
-
Install Node.js using NodeSource:
Node.js serves as the runtime environment for Next.js projects, enabling efficient execution of JavaScript code on the server side
- Install Java JDK 11:
Jenkins is a Java-based application and requires the Java Development Kit for execution
- Install wget and unzip:
Installing the required tools to unzip and retrieve files from the web
- Install Terraform:
Terraform is required for resource deployment on AWS and Cloudflare
- Install Terragrunt:
Terragrunt simplifies sharing variables across Terraform modules, promoting efficient and organized variable management
- Install AWS CLI:
AWS CLI is used to interact with Amazon Web Services (AWS) resources, facilitating automated provisioning and deployment
Configuring Jenkins for Deployment
With Jenkins, Traefik, and Jenkins node setup complete, configuration tasks can be performed directly within the application interface, enabling fine-tuning and customization to meet specific project requirements.
Installing necessary plugins
Installing the following plugins is crucial for enhancing the user experience:
-
Git: Enables repository cloning functionality
-
NodeJS: Provides a runtime environment for executing npm commands seamlessly
-
Pipeline: Essential for automating tasks using Jenkins Pipeline
-
SSH Agent: Facilitates secure communication and authentication
-
Blue Ocean: Offers a modern interface for visualizing and managing Jenkins pipelines
Setting up Agent Node SSH Key
The Jenkins master node establishes communication with the agent through SSH, a configuration that is managed within the Jenkins application by utilizing the SSH keys previously configured on the server.
-
Log in to your Jenkins web interface
-
Go to "Manage Jenkins" by clicking on the "Manage Jenkins" link in the Jenkins dashboard.
-
Scroll down to the security section and click on "Credentials"
-
In the "Stores scoped to Jenkins" section, click on "System"
-
Click on "Global credential (unrestricted)"
-
Click on "Add credentials" and provide the following information:
-
Kind: SSH username with private key
-
Scope: System (Jenkins and nodes only)
-
ID: Choose a unique name, e.g., "agent-key"
-
Description: Describe the purpose, e.g., "Agent Node SSH Key"
-
Username: The SSH username for your agent: e.g "root"
-
Private Key: Paste your private key here
-
-
Click the "Save" button to save the credentials.
Adding Agent Node to Jenkins
Incorporating a node into Jenkins involves configuring its parameters within the application and establishing a secure connection between the master and agent nodes.
-
Go to the "Manage Jenkins" link in the Jenkins left-hand dashboard menu
-
In the "System Configuration" section, click on "Nodes"
-
Click on "New Node" to create a new agent:
-
Node Name: Enter a unique name for the agent in Jenkins.
-
Permanent Agent: Select "Enable"
-
Click "Create"
-
Name: e.g. "Terraform Node"
-
Remote Root Directory: Set it to "/home/jenkins/agent."
-
Launch Method: Choose "Launch agents via SSH."
-
In the "Host" field, enter the agent node host IP address.
-
In the "Credentials" dropdown, select the credentials with root privileges e.g. "root"
-
Under "Host Key Verification Strategy" select "Non-Verifying Verification Strategy"
-
-
Click on "Advanced"
-
In the "Java Path" field, enter java path, to find your path, go to the agent host and run "update-alternatives --list java" e.g /usr/lib/jvm/java-11-openjdk-amd64/bin/java
-
Click the "Save" button to save the agent configuration.
Setting Jenkins Agent as running node
Setting the master node worker count to 0 ensures that all pipeline builds are executed on the agent node, optimizing resource allocation and performance within the Jenkins environment.
-
Go to the "Manage Jenkins" link in the Jenkins left-hand dashboard menu
-
In the "System Configuration" section, click on "Nodes"
-
Go to "Built-In Node" > "Configure"
-
Set "Number of executors" to 0
This will set all pipeline jobs to run on the external agent node
Setting NodeJS version
The required Node.js version for the given Next.js project can be specified in the Jenkins configuration settings, ensuring compatibility and consistency across the CI/CD pipeline
-
Go to the "Manage Jenkins" link in the Jenkins left-hand dashboard menu
-
In the "System Configuration" section, click on "Tools"
-
Scroll down to NodeJS and click Add NodeJS
-
Name it (e.g., NodeJS18) and select the NodeJS version you need for your project
- In this instance, we will use NodeJS 18.17.1
Configuring Jenkins Credentials
Jenkins credentials are set up to ensure the security and integrity of sensitive information used in pipelines. By storing these credentials securely within Jenkins, variables such as AWS_BUCKET_NAME and AWS_REGION can be assigned values without exposing plain text credentials.
The following variables will be configured for use within the pipeline:
These variables can be retrieved as follows:
AWS IAM User Setup
This step involves configuring an IAM user to obtain AWS access keys
It is important to create an IAM user rather than using your AWS account's root user
-
Login to AWS Console: Go to the AWS Management Console and log in.
-
Navigate to IAM: Search for and select IAM. Go to "Users" → "Create User".
-
Create User: Provide a username and proceed.
-
Assign Permissions: Assign the "AdministratorAccess" policy for full AWS account management capabilities.
-
Finalize User Creation: Click "Next" and "Create User".
-
Generate Access Keys:
-
After creation, find the user under "Users".
-
Select the "Security credentials" tab.
-
Under "Access keys", click "Create access key".
-
Choose the "CLI" option and confirm.
-
-
Securely Store Keys: Save the Access Key ID and Secret Access Key securely.
Cloudflare Setup for API Token and Zone ID
Setting up the Cloudflare token ID with restricted permissions adheres to best practices, ensuring secure and controlled access for optimal security measures within Jenkins.
-
Log In to Cloudflare: Open the Cloudflare dashboard and sign in.
-
Create API Token: Go to Account > My Profile > API Tokens > Create Token > Create Custom Token.
-
Name Your Token: Enter a name for the token, such as "Edit Zone".
-
Configure Permissions: Set the following permissions for the token:
-
Zone: Zone Settings - Edit
-
Zone: Zone - Read
-
Zone: Page Rules - Edit
-
Zone: DNS - Edit
Each permission should be applied to the "Zone" level for precise control.
-
-
Create Token: Click the button to create your token.
-
Securely Store Token: Save the Cloudflare token securely.
-
Obtain Zone ID:
-
Select the relevant domain from the dashboard.
-
Click on the Overview tab
-
Locate the Zone ID in the API section on the right-hand panel
-
Record the Zone ID securely
-
Creating GitHub SSH Key
Creating a GitHub SSH key enables the deployment of a private React/Next.js website repository, ensuring secure and authenticated access within Jenkins. Additionally, this SSH key grants access to private GitHub repositories, offering flexibility in cases where the Terraform repository used for the pipeline should not be made public.
-
Generate an RSA SSH Key Pair
- Securely store both the Public and Private keys
-
Log into GitHub
-
Navigate to your GitHub account settings
-
Go to "SSH and GPG keys"
-
Select "New SSH Key"
-
Give your SSH key a title e.g JENKINS_REPO_SSH
-
Enter the Public key generated earlier in the 'Key' section
-
Click "Add SSH Key"
Setting Credentials
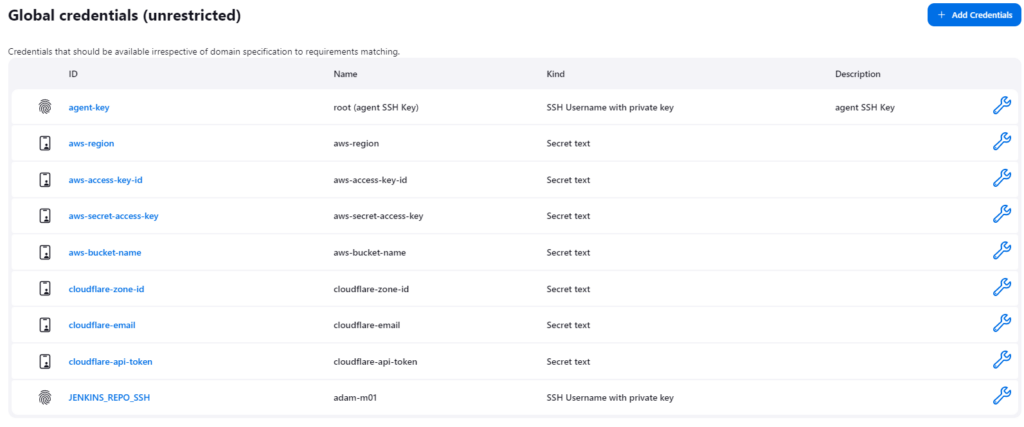
We will set the credentials inside Jenkins by the following:
-
Go to the "Manage Jenkins" link in the Jenkins left-hand dashboard menu.
-
In the "Security" section, click on "Credentials"
-
In the "Stores scoped to Jenkins" section, click on "System"
-
Click on "Global credentials (unrestricted)"
-
Select "Add Credentials"
-
Add each AWS and Cloudflare Key and Tokens as a new credential for each value with the following:
-
Kind: Secret text
-
Scope: Global
-
Secret: Credential Value or Access Token acquired earlier
-
ID: Credential name used in the pipeline e.g aws-access-key-id
-
Description: Info of the credential e.g AWS Access Key ID
-
Click "Create"
-
-
Add the GitHub SSH Key Credential with the following:
-
Kind: SSH username with private key
-
ID: Credential name used in the pipeline e.g JENKINS_REPO_SSH
-
Description: Info of the credential e.g Github SSH key
-
Username: Enter your GitHub username
-
Private Key: Select "Enter Directly"
-
Click "Add"
-
Enter the Private key generated earlier in the 'Key' section
-
-
Click "Create"
-
-
Add the GitHub SSH Key Credential with the following:
Pipeline Configuration
This Jenkins pipeline automates the deployment of a Next.js project on AWS. It integrates several tools: Jenkins for continuous integration/continuous deployment (CI/CD), Terraform/Terragrunt for infrastructure as code, and AWS S3 for hosting. The pipeline is structured to support various actions: deploying the application, destroying the infrastructure, and cleaning up the local repository.
The steps are designed for efficiency and flexibility, allowing for concurrent deployments. This means if there are updates or changes to the Next.js application code, users can directly execute the deploy pipeline again without needing to destroy the existing setup first.
The general process consists of running the pipeline build first, which initializes it, allowing the pipeline to recognize the given parameters for subsequent builds. This streamlined approach ensures that parameters are set up for all future builds.
Parameters
Offers choices ('Deploy', 'Destroy', 'Cleanup Local Repo') for specific automation tasks which can be called via the params.ACTION variable
Environment
Assigns critical AWS and Cloudflare credentials, and sets up shared infrastructure management paths:
AWS credentials: (AWS_BUCKET_NAME, AWS_ACCESS_KEY_ID, etc.) for accessing AWS resources.
Cloudflare credentials: (CLOUDFLARE_EMAIL, CLOUDFLARE_API_TOKEN, etc.) for managing DNS.
Directories and Flags
INITIALIZATION_FLAG_FILE = "${SHARED_TERRAFORM_STATE_DIR}/.initialized" file serves as an initialization flag. Its presence indicates that the pipeline has been initialized, helping to manage the workflow based on whether initial setup tasks need to be performed.
SHARED_TERRAFORM_STATE_DIR = '/var/jenkins/shared_nextjs_dir' is the shared directory the pipeline uses. It can be modified to any desired location on the Jenkins agent node, serving as a shared backend to store the Terraform state files.
Stages
Initialization Check and Cleanup
Prepares the pipeline environment by ensuring that the workspace is clean or setting up initial flags if needed.
-
If "Cleanup Local Repo" is selected, it removes all files from the shared Terraform state directory and deletes the initialization flag file.
-
If the initialization flag file does not exist, it performs an initial setup by creating this file to signal that the pipeline has been initialized, halting the pipeline build.
Initialize Deployment Environment
Sets up the environment required for deployment, including SSH configuration and Terraform repository management.
-
Starts the SSH agent to handle secure connections.
-
Check if the Terraform repository already exists in the shared directory. If it does, it pulls the latest changes. If not, it clones the repository from GitHub.
In this instance, it is using my personal public repository Terraform-S3-Static-Website which can be changed to a personal private repository if required since the JENKINS_REPO_SSH key is set up.
The Terraform-S3-Static-Website is a terraform project that deploys AWS and Cloudflare attributes to accommodate the hosting of the NextJS application.
The repository can also be used as a standalone product for all static website applications outside of NextJS projects to provide hosting via AWS S3 and Cloudflare.
Visit Terraform-S3-Static-Website Repository | Here
Deploy or Destroy
This stage branches into different workflows depending on the selected action: deploying the application or destroying the infrastructure.
Actions for Deploy:
-
Fetch Next.js Codebase: Clones the Next.js application code from a GitHub repository.
-
Build Next.js Application: Installs dependencies and builds the Next.js application, archiving the build artefacts.
-
Deploy with Terraform/Terragrunt: Initializes and applies Terraform/Terragrunt configurations to set up the AWS infrastructure.
-
Sync Build Files to S3: Syncs the built Next.js application files to the specified AWS S3 bucket, making the application accessible online.
Actions for Destroy:
-
Empty S3 Bucket: Removes all files from the AWS S3 bucket to prepare for infrastructure destruction.
-
Destroy Infrastructure: Executes Terraform/Terragrunt to destroy the AWS infrastructure, effectively taking down the application.
Post-execution Actions:
-
Provides feedback on the pipeline's execution status, indicating whether it was completed successfully or was halted.
-
Echoes a message to indicate the completion of the pipeline execution for the selected action, or notes that the pipeline was halted after initialization or cleanup.
Setting Up Pipeline
-
Go to the "New Item" link in the Jenkins left-hand dashboard menu
-
Enter the pipeline name e.g NextJS Deployment
-
Select "Pipeline"
-
Click "OK"
-
In the "Pipeline" section, input the pipeline configuration inside the "Script" section
-
Click "Save"
Running Pipeline
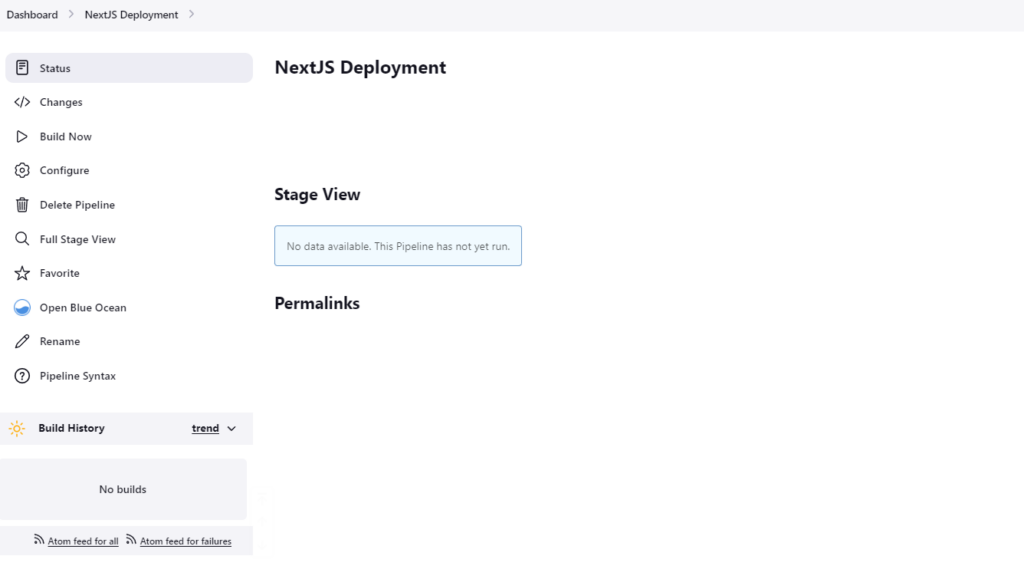
Running the pipeline consists of the first initialisation build to set the parameters, then building with the parameters in every future build.
Initialization Build
-
Go into the newly created pipeline dashboard
-
Click "Build Now" in the left-hand menu
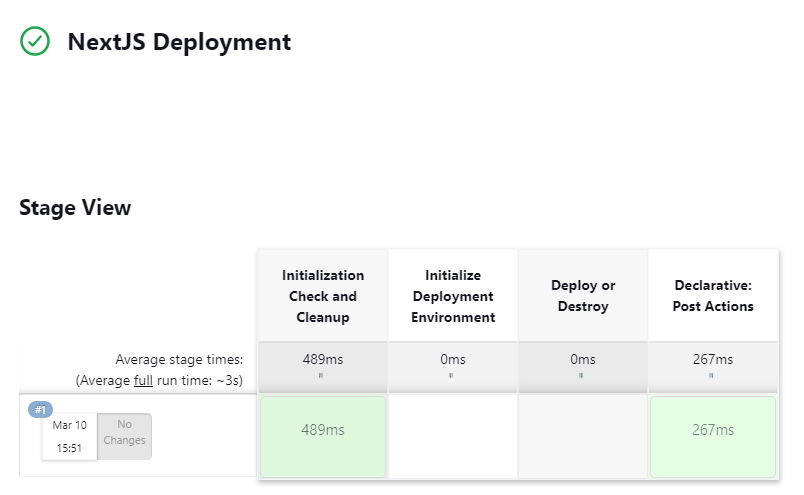
The build will run the Initialize build and create the .initialized file in the shared directory, subsequently skipping all further pipeline options.
Server Directory:
Upon refreshing the Build with Parameters option will appear replacing the "Build Now" option.
The parameters set in the pipeline are now available to select the type of pipeline build to run

Deploy Build
The successful deploy build dashboard shows each deployment step that has taken place
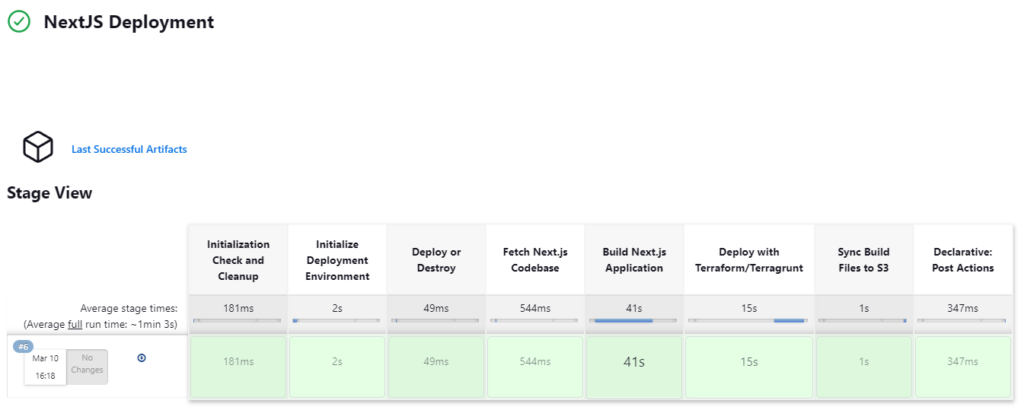
Using the Blue Ocean plugin installed and selecting the Open Blue Ocean option in the left-hand menu further in-depth detail on each step can be analyzed.
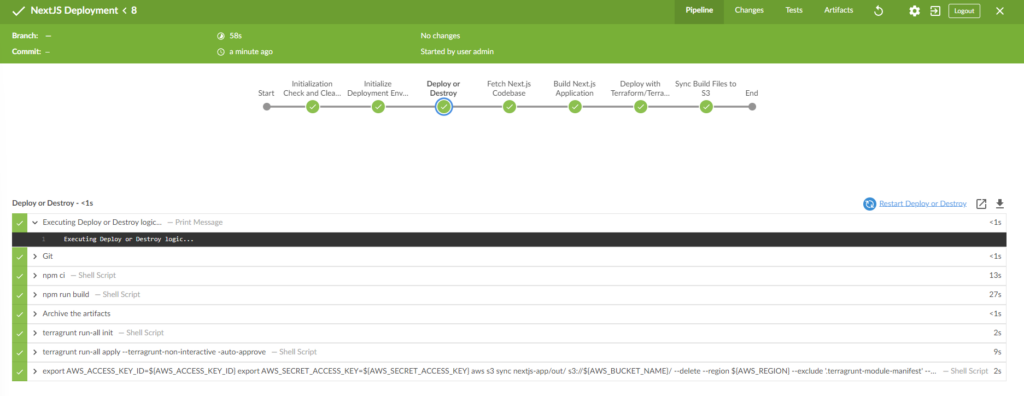
The information inside the pipeline for each step shows a console output view during the build process, in this instance terraform can be seen being successfully initialized and syncing the build files to AWS.
Upon successful build, the NextJS application can be visited via the assigned domain name on the setup process.
Server Directory:
Destroy Build
Destroy build can be run to remove the deployed resources and remove the NextJS application files, whilst still keeping the terraform state and repository files stored in the pipeline shared directory.

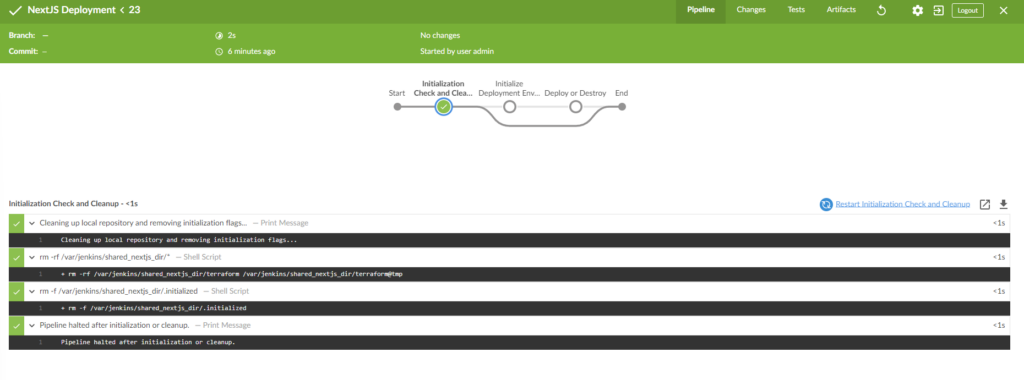
Cleanup Local Repo
Running this build will remove all files in the shared pipeline directory if required, including the terraform state files so all deployment states are no longer stored.
Server Directory:
Summary
Deploying Next.js applications on AWS utilizing Traefik, Docker, Jenkins, and Cloudflare offers a streamlined continuous integration and delivery (CI/CD) pipeline. This process outlines the steps from initial setup to deployment, emphasizing the use of Traefik as a reverse proxy, Docker for containerization, Jenkins for automation, and Cloudflare for domain management. The approach enhances the efficiency, security, and manageability of deploying web applications.
Key Steps and Components:
-
System Preparation: Update and install Docker and Docker Compose on Ubuntu servers.
-
Traefik Configuration: Set up Traefik as a reverse proxy, enabling secure and efficient routing of HTTP requests to Docker containers.
-
Jenkins Setup: Establish Jenkins for CI/CD, leveraging Docker and Traefik to automate building, testing, and deploying Next.js applications.
-
Jenkins Node Configuration: Additional setup to offload builds and tasks from the Jenkins master, improving overall performance.
-
Pipeline Configuration: Automates deployment processes, offering choices such as deploy, destroy, or clean up, with the flexibility to handle multiple deployment scenarios concurrently.
Potential Improvements for Best Practice:
-
Dedicated Jenkins User: Avoid using the root user for Jenkins operations. A specific Jenkins user with the necessary permissions can be created to enhance security and reduce potential risks.
-
IP Table Configuration: Configuring IP tables can be done to allow only specific IP addresses access to the server. This step improves server security by limiting potential points of attack.
-
IAM User and Policy Management:
-
Create an IAM user for AWS with minimal necessary permissions instead of using wider access policies like AdministratorAccess. This follows the principle of least privilege, reducing the risk of unauthorized access or accidental changes to critical resources.
-
Utilize IAM groups for easier management and assignment of policies. Attach the required policies to a group and add users to this group, simplifying policy management and ensuring consistency across users with similar access needs.
-
Incorporating the practices results in an overall secure and seamless automated deployment process to create continuous web application updates.